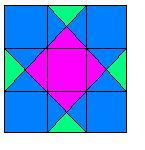
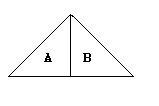
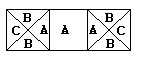
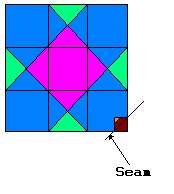
The main portion of the Blisswork pattern is simply a variation on the color placement. Instead of two fabrics and four triangles shown above, I used three fabrics and four triangles. The block has been modified to look like this:
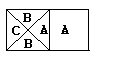
The last change to the block design was to add triangles to the four corners of the block, each outlined in another fabric.
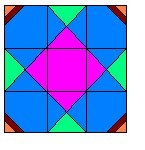
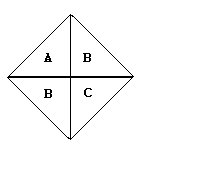
When the blocks are sewn together the triangles on the edges and in the corners come together to create squares.
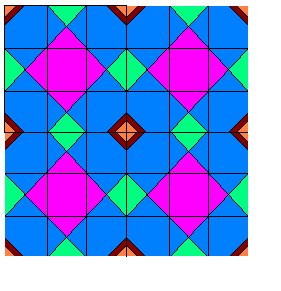
Finally I added a border. I extended the corner triangles into the border for added interest.
The pattern top requires 5 fabrics. The picture below shows the placement of each and are labelled for easy reference.

Cut your fabrics in the following ways:
- Fabric A:
- 12 3-1/2 inch x 3-1/2 inch pieces
- 12 4-1/4 inch x 4-1/4 inch pieces, then cut each square into four triangles by cutting from corner to corner, across the diagonal in both directions.
- Fabric B:
- 48 3-1/2 inch x 3-1/2 inch pieces
- 24 4-1/4 inch x 4-1/4 inch pieces, then cut each square into four triangles as for fabric A.
- Fabric C:
- 12 4-1/4 inch x 4-1/4 inch pieces, then cut each square into four triangles as for fabric A and B.
- Fabric D:
- 80 2 inch x 2 inch pieces
- 2-1/2 inch strips from remainder of fabric for binding.
- Fabric E:
- 80 1 inch x 1 inch pieces
- 4 2-1/4 inch x 33 inch pieces (border)
- 4 2-1/4 inch x 42 inch pieces (border)
You'll also need 1-1/4 yards of backing for your quilt, and a matching sized piece of batting.
Assembly
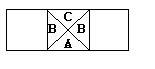
Step 1) Sew one Fabric A triangle to one Fabric B triangle, right sides together along the short seam. Open the triangle and press seam to one side.
Step 2) Now sew a second unit with Fabric B and Fabric C. Press the seam in the same direction as in the first step. Be sure Fabric B is sewn on the same edge. When you open the second unit it should have Fabric B in the same position as the unit from step 1.
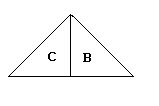
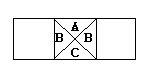
Step 3) Place the two units right side together and sew along the long side of the triangle. Press the seams so that the center point radiates out in a sort of mini pinwheel. The pinwheel shown is in two colors (instead of three) for contrast.

Make 48 total of this unit. They may be chain-pieced for speed.
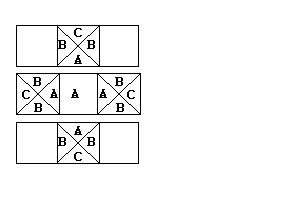
Step 4) Place a Fabric A 3-1/2 inch x 3-1/2 inch square over one of the squares created above. Sew along the edge of the square so that two Fabric A's are sewn together. Repeat for all remaining 11 Fabric A squares.
Step 5) Repeat for the opposite side of all 12 center A's, as in the picture.
Step 6) Assemble 12 top rows.
Step 7) Assemble 12 bottom rows.
Step 8) Assemble one of each rows into a single block. Repeat for a total of 12 blocks.
Step 9) Set one 2 inch x 2 inch square of Fabric D face up. Align a 1 inch x 1 inch square of Fabric E face down in a corner of the larger square, even with the edges. Sew in a diagonal from one corner of the small piece to the other. The seam should cut across the larger sqaure, as in the picture. Trim the fabric to about 1/4 inch below the seam.

Open the seam and press towards the larger square. Repeat for all remaining 79 squares.
Step 10) Place one of the squares from step 9 in the corner of a block from step 8, right sides together. Line the edge of the small square up with the edge of the block, with the corner of Fabric E pointing in towards the center of the block. Sew from one corner of the square to the other along the diagonal. Trim the triangle of fabric left below the seam and press the seam towards the inside of the block.
Repeat for each corner of all 12 blocks.
Step 11) Assemble the top by sewing three blocks together to create a row. Sew four rows then sew the rows together.
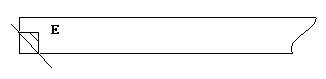
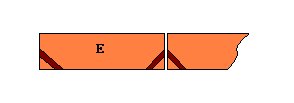
Step 12) Place one of the squares from step 9 in the lower left hand corner of a 2-1/4 inch x 33 inch strip of Fabric E, right sides together. The small triangle should point away from the corner the sqaure is aligned with. Sew corner to corner across the square, trim and press open as for step 10.
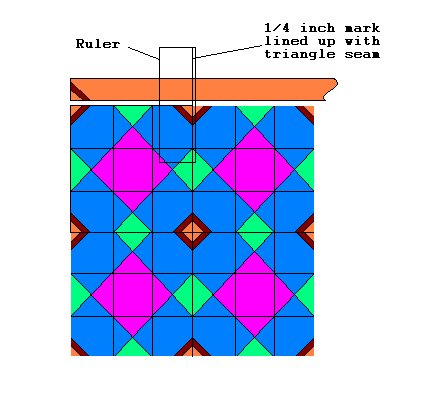
Step 13) Line the triangle up with the upper left triangle on the top side of the quilt top. Use a clear rotary cutting ruler to find the center of the next triangle on the quilt top. Then line the center of the triangle seam up with the 1/4 inch mark on the ruler, and cut the strip. Your strip should now be the length from the edge of the quilt to the center of the next triangle, plus a quarter inch.
Step 14) Place a small square in the lower right corner of the newly cut strip. Sew across the square, corner to corner, trim and press.
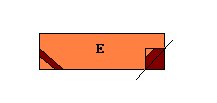
Step 15) Repeat step 12 with the long piece of the cut strip. Trim and press. Sew the short piece from step 14 to this new piece:
Place the strip against the quilt top to check your work. The triangles should match up in positioning.
Step 16) Repeat the process of steps 12 - 15 with the strip until your strip looks like this:
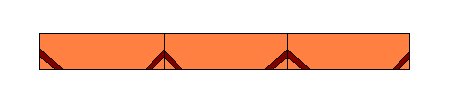
Sew the strip on to the quilt top. Repeat steps 12-15 to create the bottom border and sew to the quilt top as well.
Step 17) Cut a 5 inch piece from a 2-1/4 x 42 inch piece of Fabric E. Sew a square, from corner to corner to the lower right hand edge of the short piece. Sew a square to the lower left hand edge of the long piece. Sew the two strips together, then line up the strip with the quilt top as below. There will be a short piece of excess that sticks past the bottom border.
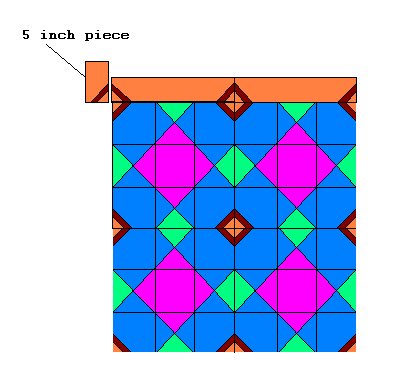
Proceed as in step 13, and moving through to step 16 until all triangles are matched. Sew on the side border and repeat for the other side. Cut the excess off the corners so that the corners are square.
Step 18) Sew one 2-1/4 inch x 33 inch strip of fabric E to the top edge, then the bottom edge. Then sew one 2-1/4 inch x 42 inch strip of Fabric E to one long edge and then the other. Trim to square up the quilt.
Step 19) Lay your backing right side down, then place an equal sized piece of batting on top. Smooth your quilt top over the other two layers, face up. Baste & quilt. Remove the basting threads, trim the edges and bind.
Step 20) Don't forget to sign your quilt!
 Ta Dah!


No comments:
Post a Comment