Hello! It's been a few weeks since I've posted seriously because I've been planning the Big Post, well, since the 22nd. Below is my gift to the world to celebrate my very first Blogiversary. I was calling it my Blirthday but The Husband thought Blogiversary had more snazz.
The free pattern below is pretty rough as it is my first attempt at writing up instructions for something I designed. Take the pictures with a grain of salt, they are not to scale or exact. I mean, come on. How exact can you get drawing with the Paint program? Feedback is of course welcome as I'd like to improve my skill at writing instructions. Is it clear? What needs more or less explanation? Do the pictures add anything for you?
And you have my permission to use the pattern for personal use, which excludes use as a teaching tool or any form of publication. Even if you are teaching how not to write a pattern.
Oh, and not that I haven't received any gifts myself today. My boss informed me this afternoon that I am the lucky (though not undeserving) recipient of a promotion. Woohoo! And just this morning I was pondering some recent costs we've inflicted on our household budget and wondering how on earth we'll manage to pay for it without going in to debt, and wham! A promotion, complete with raise. So I've been blessed today, on this special day, my blogiversary. Thanks for reading, and many blessings to you as well.
Thursday, November 30, 2006
Wednesday, November 22, 2006
Blisswork Pattern
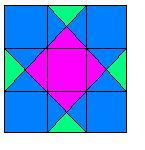
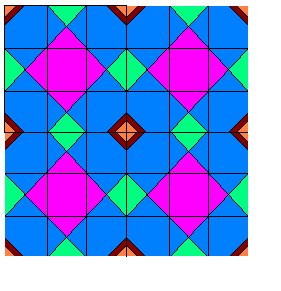
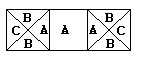
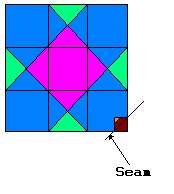
This pattern takes its inspiration from an Ohio Star block. The Ohio Star is made up of three components: four solid corner squares, one contrasting central square, and four squares created by four triangles cut from two fabrics.

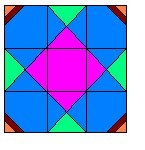
The main portion of the Blisswork pattern is simply a variation on the color placement. Instead of two fabrics and four triangles shown above, I used three fabrics and four triangles. The block has been modified to look like this:

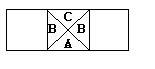
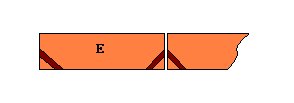
The last change to the block design was to add triangles to the four corners of the block, each outlined in another fabric.

When the blocks are sewn together the triangles on the edges and in the corners come together to create squares.

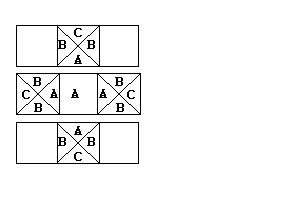
Finally I added a border. I extended the corner triangles into the border for added interest.
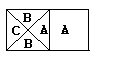
The pattern top requires 5 fabrics. The picture below shows the placement of each and are labelled for easy reference.

Cut your fabrics in the following ways:
You'll also need 1-1/4 yards of backing for your quilt, and a matching sized piece of batting.
Assembly
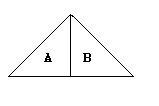
Step 1) Sew one Fabric A triangle to one Fabric B triangle, right sides together along the short seam. Open the triangle and press seam to one side.

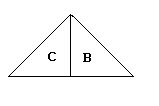
Step 2) Now sew a second unit with Fabric B and Fabric C. Press the seam in the same direction as in the first step. Be sure Fabric B is sewn on the same edge. When you open the second unit it should have Fabric B in the same position as the unit from step 1.

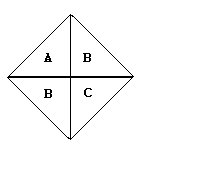
Step 3) Place the two units right side together and sew along the long side of the triangle. Press the seams so that the center point radiates out in a sort of mini pinwheel. The pinwheel shown is in two colors (instead of three) for contrast.


Make 48 total of this unit. They may be chain-pieced for speed.
Step 4) Place a Fabric A 3-1/2 inch x 3-1/2 inch square over one of the squares created above. Sew along the edge of the square so that two Fabric A's are sewn together. Repeat for all remaining 11 Fabric A squares.
Step 5) Repeat for the opposite side of all 12 center A's, as in the picture.

Step 6) Assemble 12 top rows.

Step 7) Assemble 12 bottom rows.

Step 8) Assemble one of each rows into a single block. Repeat for a total of 12 blocks.

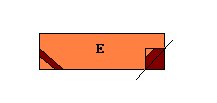
Step 9) Set one 2 inch x 2 inch square of Fabric D face up. Align a 1 inch x 1 inch square of Fabric E face down in a corner of the larger square, even with the edges. Sew in a diagonal from one corner of the small piece to the other. The seam should cut across the larger sqaure, as in the picture. Trim the fabric to about 1/4 inch below the seam.

Open the seam and press towards the larger square. Repeat for all remaining 79 squares.
Step 10) Place one of the squares from step 9 in the corner of a block from step 8, right sides together. Line the edge of the small square up with the edge of the block, with the corner of Fabric E pointing in towards the center of the block. Sew from one corner of the square to the other along the diagonal. Trim the triangle of fabric left below the seam and press the seam towards the inside of the block.

Repeat for each corner of all 12 blocks.
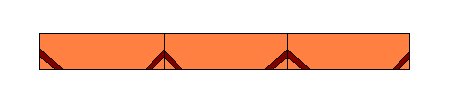
Step 11) Assemble the top by sewing three blocks together to create a row. Sew four rows then sew the rows together.
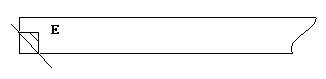
Step 12) Place one of the squares from step 9 in the lower left hand corner of a 2-1/4 inch x 33 inch strip of Fabric E, right sides together. The small triangle should point away from the corner the sqaure is aligned with. Sew corner to corner across the square, trim and press open as for step 10.

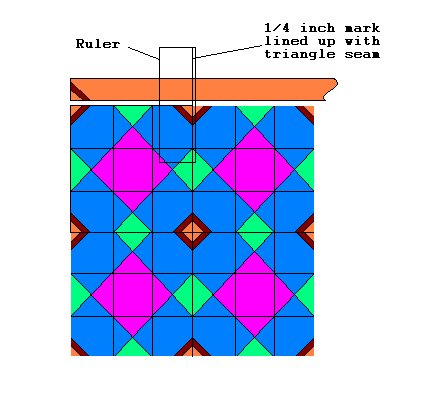
Step 13) Line the triangle up with the upper left triangle on the top side of the quilt top. Use a clear rotary cutting ruler to find the center of the next triangle on the quilt top. Then line the center of the triangle seam up with the 1/4 inch mark on the ruler, and cut the strip. Your strip should now be the length from the edge of the quilt to the center of the next triangle, plus a quarter inch.

Step 14) Place a small square in the lower right corner of the newly cut strip. Sew across the square, corner to corner, trim and press.

Step 15) Repeat step 12 with the long piece of the cut strip. Trim and press. Sew the short piece from step 14 to this new piece:

Place the strip against the quilt top to check your work. The triangles should match up in positioning.
Step 16) Repeat the process of steps 12 - 15 with the strip until your strip looks like this:

Sew the strip on to the quilt top. Repeat steps 12-15 to create the bottom border and sew to the quilt top as well.
Step 17) Cut a 5 inch piece from a 2-1/4 x 42 inch piece of Fabric E. Sew a square, from corner to corner to the lower right hand edge of the short piece. Sew a square to the lower left hand edge of the long piece. Sew the two strips together, then line up the strip with the quilt top as below. There will be a short piece of excess that sticks past the bottom border.

Proceed as in step 13, and moving through to step 16 until all triangles are matched. Sew on the side border and repeat for the other side. Cut the excess off the corners so that the corners are square.
Step 18) Sew one 2-1/4 inch x 33 inch strip of fabric E to the top edge, then the bottom edge. Then sew one 2-1/4 inch x 42 inch strip of Fabric E to one long edge and then the other. Trim to square up the quilt.
Step 19) Lay your backing right side down, then place an equal sized piece of batting on top. Smooth your quilt top over the other two layers, face up. Baste & quilt. Remove the basting threads, trim the edges and bind.
Step 20) Don't forget to sign your quilt!
 Ta Dah!
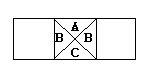
The main portion of the Blisswork pattern is simply a variation on the color placement. Instead of two fabrics and four triangles shown above, I used three fabrics and four triangles. The block has been modified to look like this:
The last change to the block design was to add triangles to the four corners of the block, each outlined in another fabric.
When the blocks are sewn together the triangles on the edges and in the corners come together to create squares.
Finally I added a border. I extended the corner triangles into the border for added interest.
The pattern top requires 5 fabrics. The picture below shows the placement of each and are labelled for easy reference.

Cut your fabrics in the following ways:
- Fabric A:
- 12 3-1/2 inch x 3-1/2 inch pieces
- 12 4-1/4 inch x 4-1/4 inch pieces, then cut each square into four triangles by cutting from corner to corner, across the diagonal in both directions.
- Fabric B:
- 48 3-1/2 inch x 3-1/2 inch pieces
- 24 4-1/4 inch x 4-1/4 inch pieces, then cut each square into four triangles as for fabric A.
- Fabric C:
- 12 4-1/4 inch x 4-1/4 inch pieces, then cut each square into four triangles as for fabric A and B.
- Fabric D:
- 80 2 inch x 2 inch pieces
- 2-1/2 inch strips from remainder of fabric for binding.
- Fabric E:
- 80 1 inch x 1 inch pieces
- 4 2-1/4 inch x 33 inch pieces (border)
- 4 2-1/4 inch x 42 inch pieces (border)
You'll also need 1-1/4 yards of backing for your quilt, and a matching sized piece of batting.
Assembly
Step 1) Sew one Fabric A triangle to one Fabric B triangle, right sides together along the short seam. Open the triangle and press seam to one side.
Step 2) Now sew a second unit with Fabric B and Fabric C. Press the seam in the same direction as in the first step. Be sure Fabric B is sewn on the same edge. When you open the second unit it should have Fabric B in the same position as the unit from step 1.
Step 3) Place the two units right side together and sew along the long side of the triangle. Press the seams so that the center point radiates out in a sort of mini pinwheel. The pinwheel shown is in two colors (instead of three) for contrast.

Make 48 total of this unit. They may be chain-pieced for speed.
Step 4) Place a Fabric A 3-1/2 inch x 3-1/2 inch square over one of the squares created above. Sew along the edge of the square so that two Fabric A's are sewn together. Repeat for all remaining 11 Fabric A squares.

Step 5) Repeat for the opposite side of all 12 center A's, as in the picture.
Step 6) Assemble 12 top rows.
Step 7) Assemble 12 bottom rows.
Step 8) Assemble one of each rows into a single block. Repeat for a total of 12 blocks.
Step 9) Set one 2 inch x 2 inch square of Fabric D face up. Align a 1 inch x 1 inch square of Fabric E face down in a corner of the larger square, even with the edges. Sew in a diagonal from one corner of the small piece to the other. The seam should cut across the larger sqaure, as in the picture. Trim the fabric to about 1/4 inch below the seam.

Open the seam and press towards the larger square. Repeat for all remaining 79 squares.
Step 10) Place one of the squares from step 9 in the corner of a block from step 8, right sides together. Line the edge of the small square up with the edge of the block, with the corner of Fabric E pointing in towards the center of the block. Sew from one corner of the square to the other along the diagonal. Trim the triangle of fabric left below the seam and press the seam towards the inside of the block.
Repeat for each corner of all 12 blocks.
Step 11) Assemble the top by sewing three blocks together to create a row. Sew four rows then sew the rows together.
Step 12) Place one of the squares from step 9 in the lower left hand corner of a 2-1/4 inch x 33 inch strip of Fabric E, right sides together. The small triangle should point away from the corner the sqaure is aligned with. Sew corner to corner across the square, trim and press open as for step 10.
Step 13) Line the triangle up with the upper left triangle on the top side of the quilt top. Use a clear rotary cutting ruler to find the center of the next triangle on the quilt top. Then line the center of the triangle seam up with the 1/4 inch mark on the ruler, and cut the strip. Your strip should now be the length from the edge of the quilt to the center of the next triangle, plus a quarter inch.
Step 14) Place a small square in the lower right corner of the newly cut strip. Sew across the square, corner to corner, trim and press.
Step 15) Repeat step 12 with the long piece of the cut strip. Trim and press. Sew the short piece from step 14 to this new piece:
Place the strip against the quilt top to check your work. The triangles should match up in positioning.
Step 16) Repeat the process of steps 12 - 15 with the strip until your strip looks like this:
Sew the strip on to the quilt top. Repeat steps 12-15 to create the bottom border and sew to the quilt top as well.
Step 17) Cut a 5 inch piece from a 2-1/4 x 42 inch piece of Fabric E. Sew a square, from corner to corner to the lower right hand edge of the short piece. Sew a square to the lower left hand edge of the long piece. Sew the two strips together, then line up the strip with the quilt top as below. There will be a short piece of excess that sticks past the bottom border.
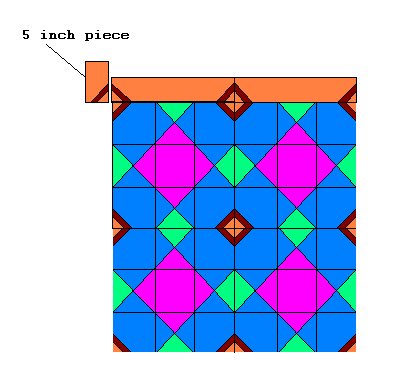
Proceed as in step 13, and moving through to step 16 until all triangles are matched. Sew on the side border and repeat for the other side. Cut the excess off the corners so that the corners are square.
Step 18) Sew one 2-1/4 inch x 33 inch strip of fabric E to the top edge, then the bottom edge. Then sew one 2-1/4 inch x 42 inch strip of Fabric E to one long edge and then the other. Trim to square up the quilt.
Step 19) Lay your backing right side down, then place an equal sized piece of batting on top. Smooth your quilt top over the other two layers, face up. Baste & quilt. Remove the basting threads, trim the edges and bind.
Step 20) Don't forget to sign your quilt!
 Ta Dah!
Tuesday, November 21, 2006
Broken goal
Ok, I know it was my goal to include a photo in at least every other post. But I've only had time to post from work lately and no photos around.
But I thought I needed to update you on The Girl's quilt progress. I have finished quilting the main portion of the top. Ta-dah! Now I am on to quilting the border. I decided to just stitch in the ditch and add her name in script in one bar of the border.
Unfortunately I still have not finished cutting out her coat pieces, though, so that means no sewing of the coat either. I am thinking it won't be done in time for Thanksgiving wear. I am a little sad about that but not bent out of shape.
And I did finish painting the kitchen window, which had been scuffed up when we had our counters and cabinets replaced last year. I just need to scrape the slopped-on-the-glass paint and also (ahem) sew the curtain. I know, I know. It's been forever since I started that project.
Oh, and a new development. We need new living room carpet. The other day The Husband and The Boy went to get haircuts, and I was left at home to give The Girl a bath. The Husband had started a fire before he left, and while I was upstairs with The Girl in the bathroom I heard a big thump. I knew right away what it was...a giant log that The Husband put in the fire before he left fell out. I raced downstairs and found it sitting on both the hearth and carpet. I used the poker tool to get it back on the hearth, but I wasn't fast enough. We now have a pretty good-sized blackened melted area of the carpet. D'oh. Then of course I'm standing there thinking, this log is on fire for crying out loud, how am I supposed to get it back in there? After several quick fire-tool experiments I found I could lift it by balancing it on the poker and the shovel. I hoisted it back in and this time closed the glass doors. Then I threw a glass of water on the smoldering carpet so I could get back to the girl. We had originally planned to replace the carpet in January or February, so really it's not a big deal. But still. It used to look at least semi-presentable with only shadows of stains. This is like a black hole, irresistably drawing your eye as if your eye is made of of mass, light, and gravity. Ugh.
Nothing else major to report, except that I've started collecting photos for the secret project. That's been fun except the kiddies keep trying to step on them.
Friday, November 10, 2006
Photos on quilts
Chalicat asked about how I would get photos into a quilt yesterday. So here is my (hopeful) explanation. Note it is hopeful because I have not yet tried it and don't know how good the results will be.
First, you take your fabric. You wash and dry it to get all of the yucky potential residues and what-have-you out of the fabric (apparently some manufacturers put stuff on the fabric, I'm assuming to make it drape prettier or give it a softer hand or whatever). Then, you use a product called Bubble Jet Set 2000 to totally soak the fabric. You hang it up without rinsing it or wringing it and let the fabric dry.
Then once it is dry, you can cut it. You cut it into a size your printer can handle, probably roughly 8.5 by 11. Then you iron a piece of freezer paper to the back of the fabric, and give it a final trimming so that it is nice and even on all sides.
Now that the freezer paper is on it, the fabric is stiff enough that you can feed it through your home computer inkjet style printer. Print your picture on to the fabric, then peel your fabric off of the paper when dry.
Last but not least, you need to wash your fabric photo in a chemical that will attract and remove extra dyes so when the quilt is washed later the extra dye doesn't run and ruin the quilt. I chose to use a chemical called Synthrapol. I picked it because I can use it in the first step to also remove the chemical treatments on the fabric. But there are other types you can use.
Ta-da! Once the final wash has occurred and the fabric is dry it is ready to go. There are products you can use that will iron on to the fabric, but I really felt the quilt would have a much softer hand and a more professional look if the fabric itself is dyed instead of a top layer that is just fixed to the fabric with heat.
I sure hope it works. I bought both chemicals from Dharma Trading and freezer paper is readily available at the grocery store, though you can also buy it in 8.5 x 11 sheets to make the work a little easier. All you need in addition is fabric, and I bought my white muslin from Keepsake Quilting. Oh, and also the chemicals must be pretty noxious because there are lots of warnings about using it in a well ventilated area and wearing gloves. Wish me luck!
Wednesday, November 08, 2006
Super-secret project
In a fit of crazyness I decided to create a quilt for The Husband's parents. Next November 4th they will be celebrating their 40th wedding anniversary. I've created a special design for them that will contain (gulp) 128 photos of their lives together as well as some applique and possibly other embellishment.
Yep. I don't know what the heck I was thinking.
But it is a pretty simple design. The applique will only be in the center medallion (is it still a medallion if it is square?) and there will be rings of photos alternating with regular fabric. There will be a total of four rings, each representing one decade, and the border will contain a quilted handprint of each family member--including the parents. The Husband and I will be making up some kind of phantom school assignment to procure those. The color scheme is dominated by the color ruby (or, my interpretation of the color ruby) because ruby is the designated anniversary gift for 40 years. Then I also included some fabric that has dogwood blossoms on it. I guess more or less because The Father-in-law has always admired the dual-colored dogwood in our yard. And it also was a coordinating fabric for my ruby choices. He. Anyways. Here is a photo of the fabric, which just arrived from Keepsake Quilting yesterday:
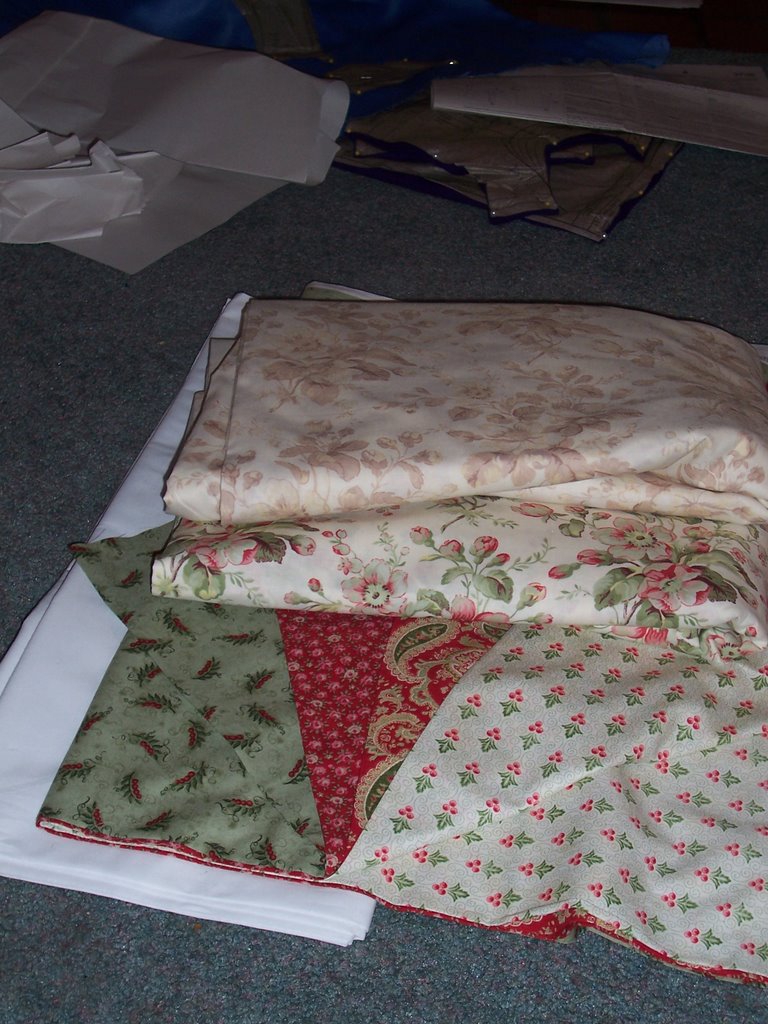
Note that there are pieces of The Girl's coat in progress in disarray in the background. It is taking me a long time to cut out the pieces for that. I'm excited to start sewing it, which I will hopefully begin this weekend. I'd like for it to be ready for Thanksgiving wear.
Monday, November 06, 2006
Fun Quilting Exercise
I saw this on Jen Moody's page. I thought it would be a good measure of my quilting progress, since my blirthday (my blog's birthday) is coming up soon. Maybe next year I can do it again and see how much I've crossed off.
Quilt activities that you've done (bold means you have...)
1. Taken a quilting class
2. Paper pieced (not yet, but thanks to Chalicat I have a book about it)
3. Hand quilted
4. Hand pieced
5. Created your own pattern
6. Published a pattern in a magazine or book
7. Gone on a quilting retreat
8. Gone to a quilting convention
9. Met someone who wrote a quilting book
10 combined your quilting with some other craft
11. Done any three dimensional quilting - like fabric origami?
12. Made something using Thimbleberries fabric
13. Made something using batiks
14. Dyed your own fabric
15. Made a landscape hanging
16 Made a New York Beauty quilt
17 Made a baby quilt
18 Made a wall hanging
19 Made a journal quilt
20 Submitted your journal quilt for viewing
21 Made a fabric postcard
22 Made a artistic trading card (ATC)
23 Exchanged artistic trading cards
24. Mailed out your postcard?
25. Made a lap quilt (though I actually called it a nap quilt)
26 Made a twin size quilt
27 Made a full size quilt
28 Made a queen size quilt
29 Made a king size quilt
30 Donated a quilt to charity
31 Sent a quilt out to a quilter
32 Thrown away a UFO
33 Given away a UFO
34 Cut up a UFO and made something else with it
35 Ripped fabric instead of cutting it
36 Made a quilt exactly like the pattern, with no changes whatsoever (this is possible?)
37 Done any Sashiko
38 Quilted your own quilt
39 Did free motion quilting
40 Put any embroidery or beads on your quilt
41 Given away your quilt to a stranger
42 Swapped fabric
43 swapped blocks
44 participated in a round robin
45 participated in an ostritch round robin
46 kept a journal about your quilting
47 written a letter to someone who made an antique quilt
49 kept a blog about your quilting
50 participated in a gift exchange
51 sent a quilting random act of kindness
52 joined a newsgroup about quilting
53 made a quilt using a pattern from quilterscache
54 joined an online block of the month
55 made a block of the month quilt
56 subscribed to a fabric of the month club
57 bought fabric at an online store
58 bought fabric from ebay
59 own more than one sewing machine
60 have a room dedicated solely to sewing
61 hid a fabric purchase
62 finished making a holiday gift before July
63 made a landscape quilt
64 made a quilt using a book from the library
65 worked with someone else to make a quilt
66. joined a quilt guild
67 become president of a quilt guild
68 taught a quilting class
69 helped someone else get the quilting bug
70 taught a child to sew
71 made a Dear Jane block
72 Made a miniature quilt
73 watch QNN - quilters news network
73 subscribe to a quilting magazine from your own country
74 subscribe to a quilting magazine from another country
75 buy fabric from another country
76 swapped completed quilts with someone else
77 asked for quilting help online
78 gone to a quilt shop to ask for quilting help
79 bought fabric at a local quilt shop
80 travelled more than 100 miles to go to a quilt shop (technically I wasn't there just for the quilt shop, though.)
81 used nontraditional fabric for a quilt - something other than cotton or flannel
82 made a quilt using instructions given to you on a blog
83 make comments on someone's quilting blog
84 meet a quilter in person after only having talked online
85 had a quilting retreat in your home
86 own quilting software
87 made a quilt you designed on your quilting software
88 done any quilt research - history, interviewing quilters, etc. (Also thanks to Chalicat)
89 had any quilt related subject published anywhere
90 donated a quilt to a museum
91 bought a quilt from a thrift store
92 made a quilt using fabric from a thrift store
93 made a quilt using photos
94 made a pastel quilt
95 made a quilt using brights
96 made a quilt using ethnic fabric from another country - African, Asian, etc.
97 made a quilt using leftover blocks from other quilts
98 had your quilt in a magazine, newspaper, newsletter, TV, etc.
99. submitted your quilt to a quilt show?
100. won any ribbons with your quilts?
101 had more finished quilts than UFOs
102 made a quilt using reproduction fabrics
103 took a break from quilting that was longer than a year
104 made money with your quilting
105 had a job in the fabric / quilting industry
Friday, November 03, 2006
Happy (Belated) Halloween!
Happy Halloween, everyone! You'll be happy to know that both costumes made it to the completion stage, and both actually put their costumes on. I don't post photos of the kiddies because of the wackos out there, but you can trust me when I say they had a blast. Now I need to get started on The Girl's coat.
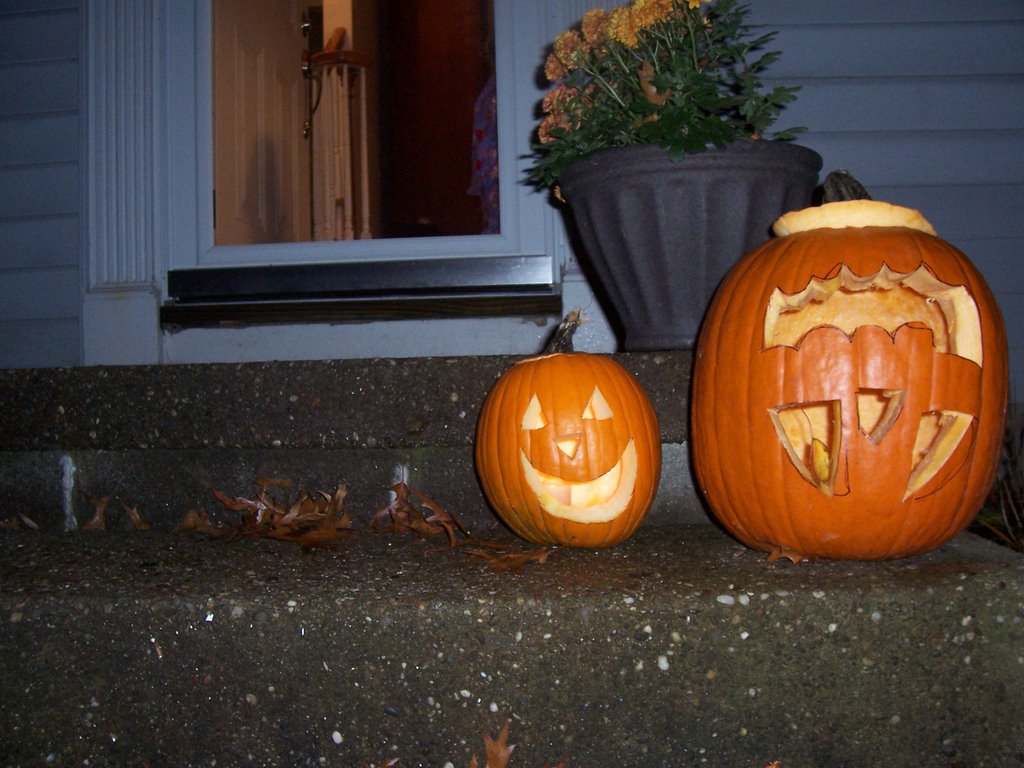
Here are our fabulous (but already disposed of) pumpkins.
Mine is the cat-head one in the lower left hand corner. The Husband says it looks like I just cut a big hole in it. I beg to differ. Me-Ow!
Here are our fabulous (but already disposed of) pumpkins.

Mine is the cat-head one in the lower left hand corner. The Husband says it looks like I just cut a big hole in it. I beg to differ. Me-Ow!
Subscribe to:
Posts (Atom)

